Oct 27, 2021
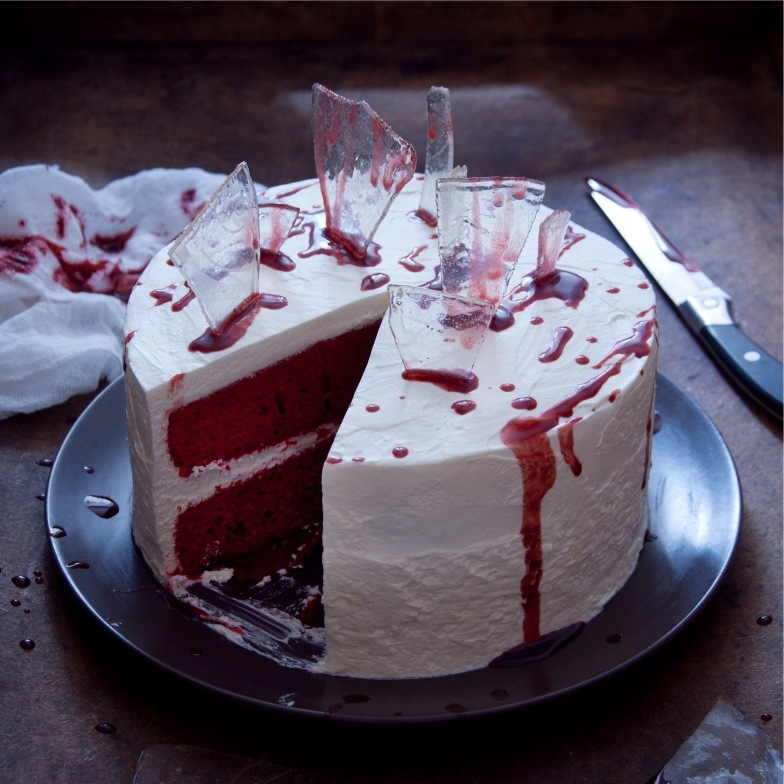
This cake boasts gorgeous red velvet cake layers paired with a thick and fluffy marshmallow cream cheese frosting, edible glass candy, and dripping raspberry “blood” that all together screams Halloween gore, horror, and fright!
PREP TIME: 20 mins ■ COOK TIME: 40 mins ■ ADDITIONAL TIME: 2 hrs ■ TOTAL TIME: 3 hours
INGREDIENTS
For the Red Velvet Cake
- 2 boxes Red Velvet Cake Mix, plus package ingredients as needed
For the Marshmallow Cream Cheese Frosting
- 1 box (8 ounces) cream cheese, softened
- 1/2 cup unsalted butter, room temperature
- 13 oz. Marshmallow Creme
- 1 1/2 – 2 cups powdered sugar, siftted
- 1/2 teaspoon vanilla extract
- 1/4 teaspoon salt
For the Edible Sugar Glass Candy
- 2 cups granulated white sugar
- 3/4 cups of water
- 2/3 cups light corn syrup
- candy thermometer
For the Raspberry “Blood”
- 1 cup frozen raspberries
- 1 tablespoon sugar
- 1/4 teaspoon corn starch
DIRECTIONS
For the Cake
- Prepare the cakes, and bake, according to the package instructions, splitting the batter into two or three circular cake pans.
- Cool completely before frosting.
For the Frosting
- In a bowl, using an electric mixer, beat together softened butter, salt and cream cheese until light and fluffy. Add vanilla and beat until combined; about 20-30 seconds.
- Add powdered sugar and mix until combined. Slowly mix in the marshmallow creme until blended well.
For the Glass Candy
- In a medium saucepan add in the sugar, corn syrup, and water.
- Insert the candy thermometer and bring to a boil. Stir constantly until the thermometer reaches 300°F.
- Once at 300°F, remove from heat and transfer immediately to a baking sheet (lined with wax paper or lightly coat with non-stick cooking oil spray).
- Allow it to sit until hardened (about 2 hours).
- Once the candy has hardened, lift the baking sheet up and drop straight down on a hard surface to crack the glass. Repeat until you have fragments at a desired size.
- Use the candy glass pieces, as desired, to decorate the cake.
For the Raspberry Blood
- Puree raspberries in a blender or food processor until smooth.
- Pour the raspberry mixture into a fine strainer to separate seeds from liquid.
- In a small saucepan, over a medium heat, bring strained raspberry liquid to a boil, add sugar and corn starch and stir until thickened; about 2 minutes.
- Remove from heat and allow to cool completely.
- Add splashes and drips of the raspberry “blood” around the frosted cake and the glass candy decorations to reach desired effect.
Oct 25, 2021
Get your Halloween spooky on! These deviled dinosaur eggs are dyed with purple food colouring and then filled with an eerily green, creamy avocado-egg-wasabi mixture – perfectly spooky Halloween colours and flavours!
INGREDIENTS
- 4 hard-boiled eggs
- Purple food colouring
- ½ large avocado, seeded and peeled
- 1 teaspoon wasabi paste
- 1 teaspoon lemon juice
- ¼ teaspoon salt
- ½ teaspoon black sesame seeds
DIRECTIONS
- In a small bowl, add water and tint with purple food coloring. Gently roll a hard-boiled egg on a hard surface, cracking shell but keeping it intact. Leave cracked eggs in food coloring mix at least 4 hours or overnight.
- Peel the shells off the eggs and cut in half lengthwise.
- Scoop out the yolks and place in a small bowl.
- Add the avocado, wasabi, lemon juice and salt to the egg yolks and with a fork, combine until smooth.
- Fill a piping bag with the avocado/egg mixture and pipe into the egg halves.
- Chill until ready to serve.
- Garnish eggs with sesame seeds just before serving.
NOTE: If you can’t find purple food colouring, you can mix your own using red and blue food colouring. To make a dark purple mix 30 drops of blue food colouring with 130 drops of red food colouring. Mix to combine then use as required. Alternatively, you can use blueberries or red/purple cabbage if you wish to use a more natural method.
Sep 16, 2021
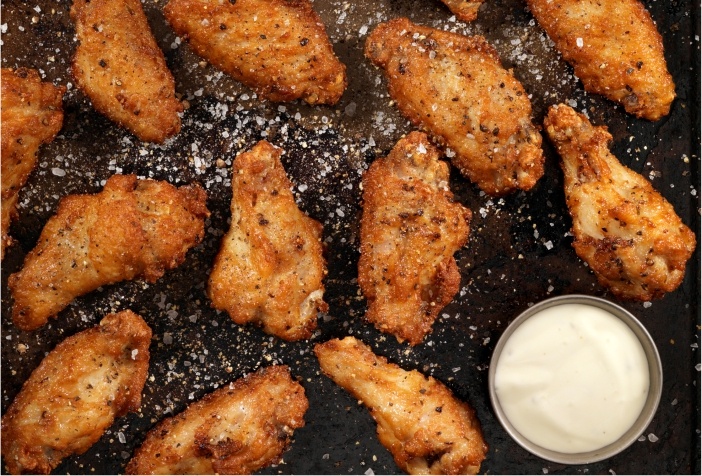
These Salt & Pepper Chicken Wings are easy to prepare and use just a few ingredients. They’re great to munch on while watching the game, for appetizers, or for snacking at any time.
Prep Time: 5 min ■ Cook Time: 30 min ■ Total Time: 35 min ■ Makes: 6 servings
INGREDIENTS
- 3 lbs chicken wings (approx. 36 wings)
- 3 teaspoons salt
- 4 teaspoons freshly ground coarse black pepper
- 4 teaspoons sesame oil
- 5 cloves garlic, finely chopped
- 4 scallions, diced
- Red pepper chili flakes, optional
DIRECTIONS
- Preheat oven to 450°F.
- LIne a baking sheet with parchment paper or grease lightly with cooking spray or oil.
- In a small bowl, mix together salt and pepper.
- Place chicken wings on the baking sheet. Sprinkle the salt and pepper mixture over the wings, making sure to cover evenly.
- Bake for 15 minutes then turn and bake for another 15-20 minutes until crispy and cooked through.
- Just before the wings are cooked, heat the sesame oil in a skillet over medium heat. Add the garlic, scallions, and red pepper chili flakes, and cook until the garlic has browned slightly.
- Remove chicken wings from oven and place in a large bowl. Add the garlic oil mixture from the skillet and toss the chicken wings until completely coated.
- Transfer the wings to a serving dish, and spoon any leftover garlic oil over the top. Serve with your favourite dipping sauce.
Sep 8, 2021
If you like cheese, you’ll want to try these tender potatoes with a deliciously crispy Parmesan crust!
Prep Time: 10 min • Cook Time: 36 min • Total Time 46 min • Makes: 4-5 servings
INGREDIENTS
- 2 tbsp vegetable oil
- 5-20 small or baby yellow potatoes
- 1/2 cup Parmesan cheese, very finely grated
- 3/4 tsp freshly cracked black pepper
- 1/2 tsp garlic powder
- 1/2 tsp sea salt
- 1/4 tsp dried oregano
- 1/4 tsp paprika
- Fresh scallions, chopped, optional
- Sour cream, optional
DIRECTIONS
- Preheat oven to 400°F.
- Add the oil to a 9 x 13-inch glass baking dish and spread evenly over the entire bottom.
- Parboil the potatoes in boiling water for 6 minutes. Remove from the water and drain on a towel.
- Slice each potato in half once they have cooled.
- In a small bowl combine the Parmesan cheese, black pepper, garlic powder, sea salt, dried oregano, and paprika; mix until well combined.
- Sprinkle the parmesan mixture evenly over the entire bottom of the pan. Do this step carefully as the cheese mixture is almost impossible to spread once immersed in the oil.
- Place the potato halves cut side down on top of the Parmesan coating making sure to press them firmly into the parmesan mixture.
- Bake for 30 minutes or until the potatoes are tender and the Parmesan crust is a deep golden colour.
- Remove from the oven and set aside for 5 minutes.
- With a metal spatula, carefully remove the potatoes from the pan making sure to keep the Parmesan coating on the potatoes.
- Serve immediately with sour cream or plain yoghurt, or garlic aioli, and chopped green onions.
NOTE: Do not use shredded Parmesan cheese as it will not crisp effectively.
Sep 8, 2021
These savoury mini tarts with cheese, onion, black olives, and chourico sausage are the perfect little bite for entertaining or for snacking at any time!
Prep Time: 20 mins ■ Cook Time: 20 mins ■ Makes: 12 mini tarts
INGREDIENTS
- 1 sheet Puff pastry
- 1/4 cup pitted black olives, drained and diced
- 1/2 chourico sausage, chopped
- 2 spring onions
- 1/2 cup grated Parmesan cheese
- 2 eggs
- Extra grated cheese, optional
DIRECTIONS
- Preheat oven to 400°F.
- In a skillet, brown the chourico sausage. Remove from skillet once cooked and transfer to a paper towel to drain off excess grease.
- Roll the pastry until about 1/4 inch thick and using a biscuit cutter, cut out rounds to fit a muffin tin.
- Gently press the puff pastry rounds out a bit with your fingers so that they line each section of the muffin pan, ensuring they come right to the top. Prick and bake in a hot oven for about 7 – 8 minutes.
- Meanwhile, chop the spring onions finely, and cook in the same skillet as the chourico, until softened.
- Line each small tart with chourico, and add some of the spring onions.
- Beat the eggs and add the grated Parmesan and chopped black olives to the egg mixture, combining well. Add freshly ground black pepper, if desired.
- Divide this mixture evenly over each tart. Add a bit more grated cheese, if desired.
- Return tarts to the oven and bake for about 10 minutes, until the cheese is bubbly and egg mixture is cooked through.
- Serve immediately.
Aug 16, 2021
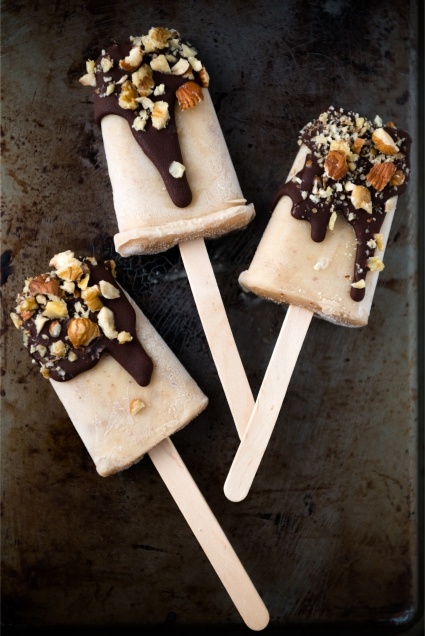
These popsicles are so easy to make and they’re dairy-free! They’re a delicious treat for kids or adults on hot summer days. This recipe makes 5 popsicles.
INGREDIENTS
- 1 frozen banana
- 1 ripe banana
- ½ can coconut cream, well stirred
- 2 tablespoon creamy peanut butter
- 1 teaspoon vanilla
- 2 tablespoon honey
- ¼ cup chopped nuts (pistachios, almonds, peanuts)
- ½ cup semi-sweet chocolate chips (use vegan chocolate chips, if you desire)
- 1 tablespoon coconut oil
DIRECTIONS
- In a blender, add bananas, cocnut cream, peanut butter, vanilla, and honey. Blend on high until mixed well.
- Pour into popsicle molds and freeze 5 hours, or until completely frozen through.
- Run mold under warm water and remove popsicles. Place on tray, or in a freezer safe container, and return to the freezer.
- Melt the chocolate chips and coconut oil in the microwave. Stir well.
- Dip the frozen popsicles into the melted chocolate and sprinkle with nuts of your choice.
- Serve immediately or return to the freezer.